![]()
 N
the following instructions, I intend to give as clear
an account as possible of dulcimer-making, so that any
amateur desirous of making one of these sweet-toned instruments
can do so, with little trouble and (what is more important
to some) with little expense. Of course, it can be done
cheaper by buying inferior material; but if the amateur
wants the best returns for his trouble and money, let
him buy the best material.
N
the following instructions, I intend to give as clear
an account as possible of dulcimer-making, so that any
amateur desirous of making one of these sweet-toned instruments
can do so, with little trouble and (what is more important
to some) with little expense. Of course, it can be done
cheaper by buying inferior material; but if the amateur
wants the best returns for his trouble and money, let
him buy the best material.
With this object in view, let him go to a wood-yard (if he has not the wood on hand), and buy two pieces of good, sound, English oak, clear of knots, 22 inches long, and 3 inches square, for the sides ; one piece, 46 inches long, 2 3/4 inches broad, and 2 inches thick, for the bottom ; and a similar piece 20 inches long for the top.
|
click for fig. 1 |
Having got the wood to the workshop, commence operations by dressing up the two pieces for the sides. Having got them nicely squared, mark off 1/2 inch along one side, and bevel the wood down to the mark, the piece will then be 3 inches deep on the inside, and 2 1/2 inches on the outside, see Fig. 1. Both sides must be made perfectly alike.
|
click for fig. 2 |

Each end must now be cut aslant, as shown in Fig. 2 ; to do this, mark off 2 5/8 inches at each end, at the bottom end on the inside, at the top end on the outside ; then saw them through to the opposite corner, this will give them the proper slant. The dotted lines (Fig. 2) show the pieces that have to be cut off.
|
click for fig. 3 |

I may here state that the bevelled side is for the top side, and will be the only side seen when the dulcimer is finished. The ends must now be cut for the top and bottom to be fixed to them; this is merely a groove 1 inch broad and 2 inches deep. A glance at Fig. 3 will show how this is to be done.
|
click for fig. 4 |
Now prepare the top and bottom pieces, dress them nicely up, and cut them to fit into the sides as tight as possible. Fig. 4 shows the shape of the top and bottom pieces.
|
click for fig. 6 |
Now fasten these together with wood pegs, taking them right through from the upper to the underneath side, keeping them clear of where the tuning pegs will fall, E, Fig. 6.
|
click for fig. 5 |
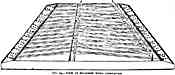
This done, take two pieces of oak, 1 inch broad and 3/8 inch thick, and fasten them to the sides (with wood pegs and glue) to come up flush with the top and bottom, c, Fig. 6, this forms a ledge all round for the belly to rest on. A piece of pine is next required, 46 inches long, 14 inches broad, and 5/8 inch thick for the back. It must be planed nice and smooth, and then fastened on with screws. The back comes up flush with the outside of the frame all round. Fig. 5 shows the back when put on.
A piece of pine is next required for an inside bridge. This must come up level with, and be let into, the top and bottom pieces; and as it must be underneath the outside bridge, I will now show the proper place for it.
Divide the top and bottom of the dulcimer into five equal parts, and fix the bridge at the end of the third section, counting from the right-hand side, this gives three parts to the right, and two to the left of the bridge; Fig. 6 shows how this is done. Another inside is next required; this will have to be longer than the other, and must be fixed about 2 inches from the right-hand side, B, Fig. 6. Both bridges must be about 1/2 inch thick, and perforated with holes; two pieces of pine, about 1 inch square and 2 3/4 inches long, with a hole bored down the centre, must now be glued on to the back, 1 inch to the left of the bridge, and one of them 5 1/4 inches from the bottom, and the other 5 1/4 inches from the top, D, Fig. 6. The blocks and the bridges must be level with the top and bottom, so that the belly will rest evenly on the whole of them.
A piece of good, sound yellow, or Swiss pine, is next required for the belly. If it cannot be got 1/4 inch thick, clear of cracks, get it 1/2 inch, and plane it down to the required thickness - that is, to be level with the top of the sides when it is resting on the ledge mentioned above, then, about the centre of it, cut out a f-shaped hole, about the same size as those on a violin. Before fastening the belly on, continue the holes that are in the blocks, through the back. You can now fasten the belly on, and then bore the holes through the belly from the back side.
|
click for fig. 7 |
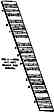
We now come to a part that requires a little care - that is, the setting-out and boring the holes for the tuning and standing pegs. The tuning pegs are fixed in the right-hand side, and the standing pegs in the left of the instrument. We will take the right-hand side, Fig. 7, for a pattern. This must be divided into fifteen parts; to accomplish this, make a mark 3/4 inch from the bottom end, and the same at the top end, divide the remainder into spaces 1 3/8 inch wide this just takes up the 19 3/8 inches. There will now be fourteen marks, and fifteen spaces. On both sides of each of the fourteen marks, make another, 1/8 inch from it. Now, evenly between the spaces 2, 4, 5, 7, 8, 9, 11, 12, and 14 (Fig. 7), make two marks 1/8 inch apart, then draw the lines evenly across, and mark off the places for the holes. Before boring them, go to a piano warehouse, and buy sixty piano screws, you will then know how big to bore the holes, bore them rather less than the screws, as they must fit tight. The dots, Fig. 7, show how the holes should be set out, the pencil lines can be rubbed out after the holes have been bored.
The other side must be set out in exactly the same manner, so that the wires will run straight and evenly across the instrument.
Having got the holes bored on both sides, give them and the belly a good rubbing with glass-paper, then rub them once or twice with raw linseed oil, and let it dry in. The oak sides may now be either varnished or French polished. The belly looks very well if it is stained to imitate mahogany. The outside of the frame need not be polished, as it is covered with mahogany, after the instrument has been strung up.
The standing pegs must be as long, but they need not be so thick, as the tuning pegs. Any blacksmith will cut sixty of these out for a very trifle.
The pegs may now be put in, and the instrument laid aside till the amateur prepares the bridges, etc.
|
click for fig. 8 |
As the aid of a blacksmith will be required to make the iron bridge, we will take it first. Take a correct measure of it, which is as follows : length, 14 3/8 inches, from top of bridge to bottom of shoulder, 3/4 inch; from bottom of shoulder to bottom of screw, 3 5/8, inches. A nut will be required for each screw (see Fig. 8). Now make a hole through the top and bottom of the dulcimer, pass the legs of the bridge through them and the two made before, and screw it tight down. As the legs are only 3 3/8 inches long, a piece of the back will have to be cut out ; let the nuts in level with the back. The top and legs of the bridge must be about 3/8 inch diameter.
Now get two pieces of oak, 1/2 inch broad and 3/8 inch thick, and the same length as the sides. Make a groove down the middle of each of them, on one of the broadest sides. Round the two corners off, smooth and polish them, and lay them on the belly flat side down, and close to the sides. Now get some brass wire, 3/32 inch diameter, cut two pieces off 19 3/8 inches long, and lay a piece in each of the grooves. These are for the wires to rest on, so as not to touch the wood.
Now go to a piano warehouse, and purebase 3 ozs. of No. 9, 2 ozs. of No. 11, and 2 ozs. of No. 13 piano wire.
|
click for fig. 9 |
Now commence to string the instrument. To do this, make a loop, Fig. 9, put it on the standing peg, and take the wire to the corresponding tuning peg on the other side, cut the wire about 2 inches past the peg, pass it
|
click for fig. 10 |
through the hole in the peg, and then with the aid of the key, Fig. 10, screw it up moderately tight. Put the whole of the wires on like this. When putting the wire on, commence with No. 9 at the bottom, and take it up seven sets ; continue with No. 11 for other seven sets, and finish with No. 13, passing those that have only two strings in the set under the iron bridge, and the others over it.
|
click for fig. 11 |
Now get a piece of oak, 14 3/8, inches long, 2 inches broad at one end, 1 1/4 inch at the other, and 1/2 inch thick. This must be rounded off at the top, and a groove run down it for a piece of brass wire to rest in. Now place it on the dulcimer, on the wires, and where the sets of wires fall that have only two in them, there cut out an arch (see Fig. 11). The arches are for the wires with two in the set to pass through, the others going over the top.
|
click for fig. 12 |
The bridge may now be polished and put into position - that is, at the end of the third section, counting from the right-hand side, as shown in Fig. 6. Now for the other bridge ; this must be 2 inches broad at one end, 1 1/4 inch at the other, 1/2 inch thick, and 19 3/8 inches long. Now lay it on the dulcimer as before, parallel with the right-hand side, and about 2 inches from it, and where the sets of wires fall that have two in them, there mark off, and leave a foot small enough to stand between the other wires without touching them; the rest maybe cut out to form arches (see Fig. 12). The sets of wires with two in them pass over this bridge, and those with three in the set through the arches. The instrument is now fit for tuning. It must be understood that the broad end of the bridges are for the bottom end.
The tuning of the instrument to some will be the most difficult part ; but if the amateur can get access to a piano, let him set the bottom set of strings to the tone of the highest A in the bass part, and continue it up to the top, same as the piano, the three-stringed sets for the natural tones, and the others for the halftones. If the middle bridge is set correct, the strings on the left hand of it should be four notes higher than those on the right of it; that is, when the bottom set on the right-hand side sounds A, the same set on the left-hand should sound E, and unless it does this, the bridge is not set true. If he cannot get the use of a piano, let him get a tuning-fork, and a little practice will soon enable him to tune it correctly.
When I first made one, I could neither tune nor play it, but I was determined to do both, and, after a little practice, succeeded.
Each string in the set must be toned exactly alike.
The instrument is now fit for casing round the outsides. It can be done with white wood, and stained;but mahogany makes the instrumnt look better. There will be four pieces required ; measurement is useless, as you have the instrurnent to measure from. Let them stand up about 1/4 inch above the top of the dulcimer all round, and trim the edges off. Smooth it nicely, and polish it.
|
click for fig. 13 |
All that is now required is a pair of hammers to play with. To make this, get a piece of cane about 7 inches long, split it down the middle, and then thin them until they spring nicely. Now get two pieces of cork, a piece the width of the cane, cut from the end of a bottle cork, and then cut in two, will do ; fasten these to the pieces of cane, cover them with a piece of washleather (Fig. 13), and you have your instrument complete. With the exception of the feet and arches of the outside bridges, the amateur may cut them out as he pleases; I have merely made the holes, etc., for a pattern. I got a blacksmith to make my key. When ordering one, mind and take a tuning-peg with you, as the blacksmith will require it to make a hole in the key with. Should any amateur, after he has got his instrument finished, desire a stand for it to rest on, I shall be happy to give instructions and illustrations for making one.
In the foregoing instructions it has been my chief aim to point out everything as clear as possible, and I trust that any of my brother amateurs who may commence to make one will be able to finish it without difficulty, and with satisfaction to himself.
|
click for fig. 14 |